
6 Tricks to Maximise Your Pedalboard's Real Estate
We've all been there. You've got a board full of pedals. You’re extremely happy, satisfied, and with no intention of changing a single thing. But then you go and buy a fancy, new pedal that you just HAVE to own, and now you can't figure out how to fit it onto your board. You don't want to remove anything to make room, so it looks like your only option is to spend more money and scale things up with a bigger board, right? Well, not necessarily...
Phil Mallet
2021-06-10
We've all been there. You've got a board full of pedals. You’re extremely happy, satisfied, and with no intention of changing a single thing. But then you go and buy a fancy, new pedal that you just HAVE to own, and now you can't figure out how to fit it onto your board. You don't want to remove anything to make room, so it looks like your only option is to spend more money and scale things up with a bigger board, right? Well, not necessarily...
Over the years, I've found myself in this exact situation many, many times and as a result, I've had to become rather adept at playing “Pedal Tetris".
So, with that in mind, here are a handful of my best, tried and tested, tips and tricks to help enable you to squeeze every available millimetre out of your pedalboard, maximise it's real estate and hopefully let you fit all of your pedals on it, with room to spare.
Disclaimer: It should be noted that each of these suggestions might only free up a small amount of space by themselves, but when you apply all of the methods together, you'll be amazed at how much real estate will open up for additional pedals!
Be Conscious Of Your Cables
The first area you should look at is your patch cables, since they are undoubtedly going to play a major role in allowing you to place your pedals as close to each other as possible, thus opening up a little bit of extra room. The narrower the gaps between each of your pedals, the more board space you'll create for that shiny new pedal purchase of yours!
Most people already use right-angled patch cables to connect their pedals together, but these days there are many choices for cables with exceptionally small plugs on them, allowing you to place your effects closer than ever before!
EBS are one such company whose designs have become popular in recent years, thanks to the low profile and narrow width of their plugs, whilst maintaining a high level of quality.
Solderless cable kits are also extremely popular and useful for reducing the amount of empty space between enclosures, since they have miniscule plugs that can fit into the tiniest gaps! An ideal choice for cramming pedals with side-mounted jacks as close together as possible. They also allow you to create cables that are any length you require, which is perfect for preserving your carefully planned layout, since there's nothing more frustrating than having to re-think your entire board just because your cables won't reach as far as you need them to!
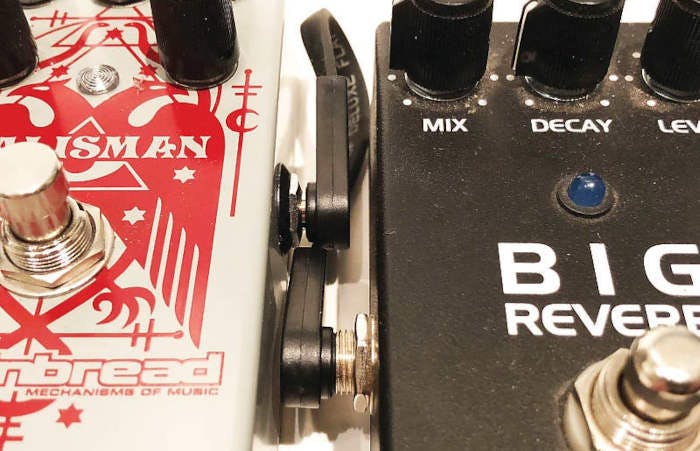
Staggering the inputs and outputs of your pedals (as pictured below) will allow you to reduce the gap between them even more. It can be far easier to achieve this when the pedals have their side jacks in different locations, whilst pedals that have their outputs in the same place will be slightly more awkward to place side-by-side than those with outputs that are staggered.
For example, an EHX Attack Decay would fit very nicely up against a Line 6 Echo Park, since their jacks are positioned far away from each other.
If you have two pedals that have their inputs and outputs in the same place, it would be wise to place another pedal between them with jacks that are either higher up, or lower down.
Another important reason to be conscious of cables, is when it comes to arranging the layout of your board. Which nicely brings us to...
Put Some Thought Into Planning Your Pedal Layout
As I mentioned earlier, many people run into issues with the length of their cables, and will organise their pedalboards based around how far their cables will reach and how much room they require. However, if you make sure that your cables fit around your preferred pedal placement, you'll find it a lot easier to maintain an efficient and organised layout.
Some pedals eliminate the problems that can be caused with side-mounted jacks entirely, by having top-mounted jacks. These leave the sides of the enclosure completely smooth, leaving you free to bunch the pedals right up against each other and fully utilise all of the available real estate.
However, be aware that many of these style of pedals can have more than one footswitch, meaning that they could be extremely tricky to hit with your feet. Especially when its neighbouring effect also has a footswitch in close proximity!
Placing a single-footswitch pedal between the two, dual-footswitch pedals, is a neat and simple solution to this problem. Even more so if it also has top jacks!
Another important factor to keep in mind, is the location of all the various power inputs that you'll need access to. While they're usually tiny and don't get in the way too much, it's still possible to overlook an awkwardly placed power input and then find yourself forced to restructure your entire layout, in order to simply provide electricity to that pedal.
Make Smart Use Of Risers
As well as being a useful way to stomp pedals in hard-to-reach places, risers can also be implemented to move pedals even closer together, since the height difference usually means that pedals with side-mounted jacks will be able to pass over/under each other.
Just be aware that the cables connected to the pedal on the riser, may obscure the knobs, switches or other important controls, of the pedals next to them on the lower level.
Some of the risers that are great for this application, are made by companies such as FIX Pedalboards, Stomp-Blox, Diago (pictured) and Pedaltrain.
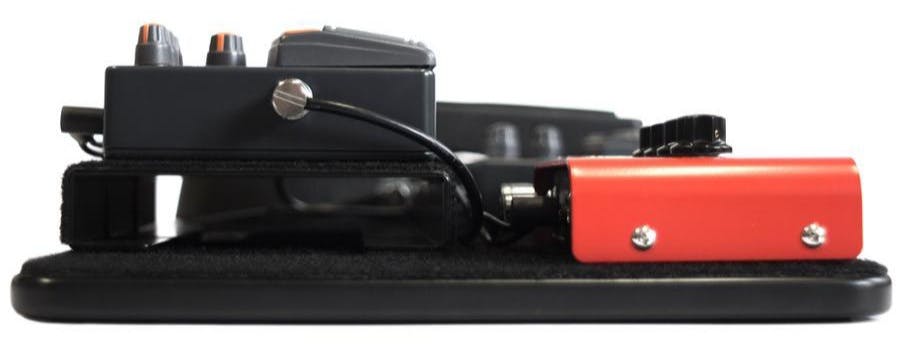
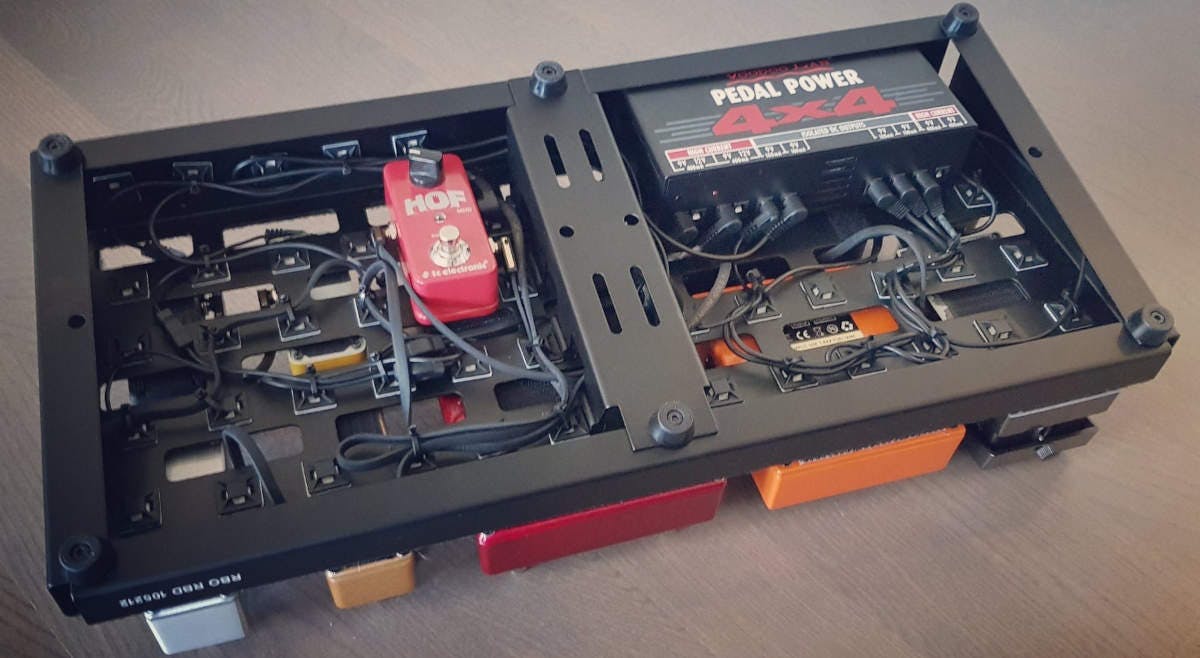
Consider Mounting Pedals "Under The Board"
There are some pedals that you might prefer to leave on all the time. These may include boosts, low gain overdrives, buffers, and EQ. Or maybe you have a cheeky little reverb pedal that you use for just a touch of springy ambience and just can't quite bring yourself to ever turn off, like the TC Electronic HOF for instance.
If you are in this position, and if your board is angled or raised, you might want to consider mounting such pedals underneath your board! (See picture below)
It might not be ideal, and you may not love the idea of hiding your pedals away below your board, like they're trapped in “The Upside Down". But if you're really serious about the efficiency of your board's real estate, you may very well find this method to be a necessary solution.
Velcro may do a good enough job at holding your smaller, lighter pedals in a suspended position. However you might need to use zip ties or Dual-Lock to secure larger, heavier pedals underneath your board.
You also might want to secure your pedal’s settings by taping up the knobs, wrapping elastic bands around them, placing rubber washers under them, or even by removing the knobs entirely.
Note: If you do decide to mount pedals under your board, make sure you remember to check they're turned on before playing a gig!
Take Some Pedals "Off-Board"
There may be some pedals that you currently use on your board, such as: a wah, volume, amp channel selector, or maybe a looper.
Some utility pedals such as these can be better utilised on the floor next to your other pedals, and thus save tonnes of room on your board for more complex effects.
Some of your larger pedals might only perform single, simple tasks, such as overdrive or modulation. If you have a pedal that fits this description, you could look at relocating it entirely and instead using a tiny, bypass loop pedal to remotely access that pedal from your board, without sacrificing precious real estate!
As with the previous suggestion, you could attach the pedal underneath your board. However, if the pedal is too large or if your current setup doesn't allow for placing certain pedals “below deck", you could look at relocating them far away from your board – perhaps to the top of your amp.
Again, depending on your priorities, this option may seem too extreme or impractical to consider.
Try Smaller Alternatives
This might be viewed by some as being an even more controversial suggestion, but most of the time you can replace some of your larger guitar pedals, with smaller ones that do a similar, or virtually identical thing!
For example, if you have a Klon KTR, Ryra The Klone, or maybe even an original Centaur (lucky you!) you could try switching it out for something like the Wampler Tumnus. If your fuzz of choice is an EHX Big Muff, you could scale things down with the Big Muff Nano. If you rock a Strymon Big Sky as your main source of ethereal reverb, you could try a Dr Scientist Atmosphere, Neunaber Immerse, Chase Bliss Dark World, or maybe an Alexander Sky5000.
Sometimes, you can get pedals that combine your favourite effects into one, space-saving box. So, if you have a Tube Screamer and a Rat in your drive section for instance, you could replace them both with a Magnetic Effects Dual Drive. Another example is the EHX Hot Wax, which combines Electro Harmonix’ Hot Tubes TS clone with their Crayon full range overdrive, resulting in a much smaller footprint than if you wanted to run both pedals independently.
Even tuner pedals are an area that you can consider for downsizing. The Boss TU-2 and TU-3 are almost the industry standard for many people, however the TC Electronic Polytune Mini is equally capable and versatile, whilst also being less than half the size. If you desire an even smaller option, there's the Pedaltrain SST (Space Saving Tuner) which is designed to fit snugly between the narrow gap of two pedals.
Note: An added benefit of going this route, is that you'll also free up an extra output on your power supply, for the new pedal that you'll now inevitably have room for!

And those are my tips and tricks for helping you get the most amount of effects onto your pedalboard as possible. I hope you're able to make use of at least one of these space-saving methods, and that doing so enables you to one day become a true, “Pedal Tetris” master!
